In an earlier post I looked at colliding with other objects in PICO-8 using a hitbox function. In this post I look at colliding with tiles that are draw to the map. The advantage of this system is that it is very simple and also allows you to draw many levels (especially for platform games) without having to worry about any extra code.
The hero in all of this is the function fget() which returns the flag for a particular sprite. In order to understand what is happening in this code, it is important to understand flags. A sprite can have any of eight flags set for any purpose. These are represented by the little circular light symbols just above the sprite map and they can be switched on or off. In the diagram below, the sprite (number 001) has flags 0, 2, 3 and 4 all set on (they are shown as the red, yellow, green and light blue dots circled in red).
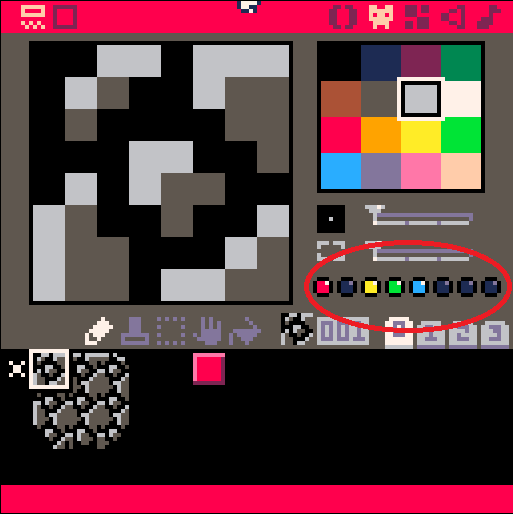
These value of any of these flags can be read by using the fget() function. This takes a sprite number and a flag number and returns either true or false depending on whether the flag has been set or not. So, looking at the diagram above, the function fget(1,0) would return true while fget(1,1) would return false. In addition, we can just call fget() with a sprite number and this returns a number to represent all the flags, so fget(1) returns 29 (1+4+8+16).
We use this to our advantage by setting the first flag (flag 0) to true for any sprite that represents a solid tile.
In the screenshot below you can see that there are 9 tiles for the solid tiles that represent the various edges of a stone style block. You could get away with a single tile, but that won’t look as good! In addition, we need a sprite for the player. I have gone with a relatively simple red square.

Using these sprites we can draw a simple map with platforms and a floor.

Before we start coding the main functions, however, we need to write a function that will tell us if the player sprite is hitting a solid tile. So, what needs to be in this function?
We know if a tile is solid as the flag for it is greater than 0 (as we set flag 1 to be true). We need to know which map tile our player is over in order to use fget() so to do this we use mget() which returns the sprite that is currently at a row and column on the map. This is really important – if we know the x and y location of the player, we must divide this by 8 to show the map column and row.
One issue with checking collisions is that the x and y of the sprite is usually the top left corner, but we need to check all corners of the sprite, so we need to take this into account.
Finally, there are two types of collision detection know as a priori and a posteriori. These are concerned with whether to check where you are and move OUT of a collision (a posteriori) or check where you WILL BE and prevent a collision occuring (a priori). We will use the a priori approach and check where we are going to be.
The diagram below summarises the requirements for our collision function:
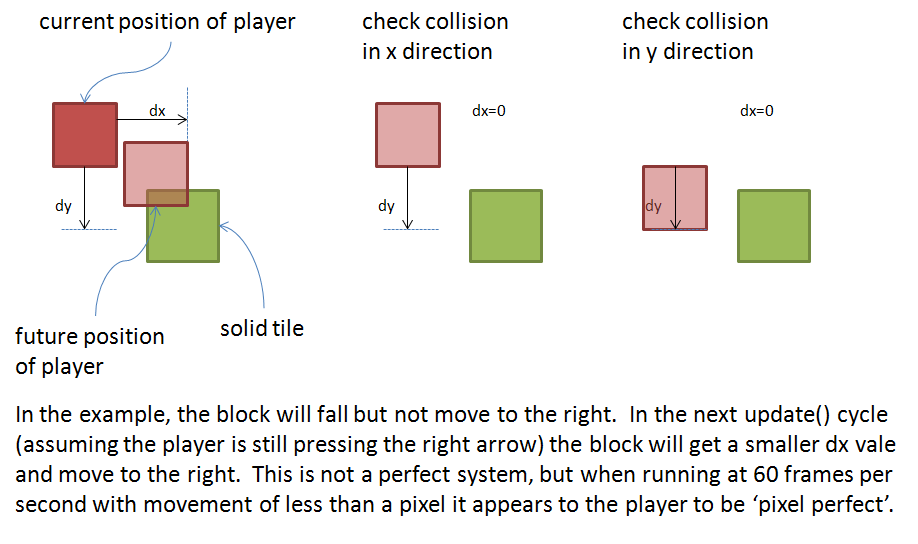
The code for the function checks the corners in the x and y direction of travel and returns true if there is a collision. You should put this function in its own tab so you know where to find it.
function hit(x,y,w,h)
  collide=false
  for i=x,x+w,w do
    if (fget(mget(i/8,y/8))>0) or
         (fget(mget(i/8,(y+h)/8))>0) then
          collide=true
    end
  end

  for i=y,y+h,h do
    if (fget(mget(x/8,i/8))>0) or
         (fget(mget((x+w)/8,i/8))>0) then
          collide=true
    end
  end

  return collide
end
In this code we use fget(mget()) to get the flag (fget()) of a sprite (mget()) at a particular location. You can also see in this code that we loop through the x and y location, but in steps of width and height. This restricts the checks to the corners only. If you have tiles which are smaller than the player, you would simply change to two lines of code in the for-loops from
for i=x,x+w,w do
to
for i=x,x+w do
which then checks every pixel along the edge of the sprite rather than the corners.
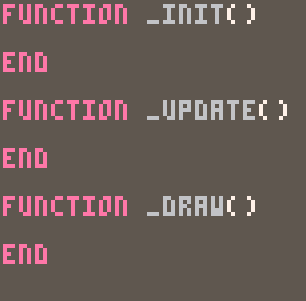
Now for the rest of the code. To start with we will need our three PICO-8 functions in each tab: function _init(), function _update() and function _draw(). Go ahead and put each one in a tab and then we can add some variables and code.
In function _init() we need to set variables for the location of the player (x and y). In order to give this game the feel of a platformer, I am also going to implement gravity in this game. I describe gravity and inertia here, but the basic idea is to control the speed of the object rather than its position. So, we need to add two more variables: dx (the speed in the x direction) and dy (the speed in the y direction). Also, we want the player to be able to jump, but only when they are on the ground so we have two other variables: on_ground which is a boolean variable that is tru when the player is on the ground and jump which is a numeric variable and records how many jumps the player has done. We use jump to allow the classic “double jump” move.
function _init()
 x=10
 y=10
 dy=0
 dx=0

 on_ground=false

 jump=0
end
In function _draw() we need to clear the screen, draw the map and draw the sprite. that’s it!
function _draw()
  cls()
  map(0,0,0,0,16,16)

  spr(6,x,y)
end
In function _update60() the clever stuff happens!
NOTEs:
- I am using
_update60()because it gives smoother motion when dealing with very small changes in dx or dy. - I am showing this in stages – don’t end up with 6 or 7 seperate function _update()s in your code!
First we need to increase the dy velocity in the downward direction:
function _update60()
  dy=dy+0.05
end
Then we need to respond to the key presses to change the x and y speeds. In addition, we need to increase dy every turn to simulate the acceleration towards the floor (i.e. gravity). Responding to key presses is described in detail in this post. We have three key presses: left right and up. Left and right are straightforward and just change the dx variable:
function _update60()
  dy=dy+0.05

  if btn(0) then
    dx=dx-0.05
  end

  if btn(1) then
    dx=dx+0.05
  end
end
For the up button, we need to know if we are on the floor or if we have only jumped once so far. Provided one of these is true, we can alter the dy by -2 to simulate a jump. If we do jump we need to make sure that we increase the number of jumps and set the on_ground value to false.
function _update60()
  dy=dy+0.05

  if btn(0) then
    dx=dx-0.05
  end

  if btn(1) then
    dx=dx+0.05
  end

  if btnp(2) and
    (on_ground or jump<2) then
    on_ground=false
    jump+=1
    dy=dy-2
  end
end
Now we can add it the a priori collision checks. This means checking where the block will be and only allowing movement to that location if the hit function returns false. If you remember from the previous collision post, it is important to check the x and y directions separately to allow the object to ‘slide’ along a surface.
function _update60()
  dy=dy+0.05

  if btn(0) then
    dx=dx-0.05
  end

  if btn(1) then
    dx=dx+0.05
  end

  if btnp(2) and
    (on_ground or jump<2) then
    on_ground=false
    jump+=1
    dy=dy-2
  end

  if hit(x+dx,y,7,7) then
    dx=0
  end

  if hit(x,y+dy,7,7) then
    if dy>0 then
      on_ground=true
    end
    dy=0
  end

end
You can see in this code that the dx and dy values are set to 0 if there is a collision. In addition, if there is a downwards collision (dy>0) then the on_ground variable is set to true.
Finally, we need to apply some friction to the movement in the x direction if the object is on the ground and then actually move the object. This is the code you would want to past into the function _update60() tab.
function _update60()
  dy=dy+0.05

  if btn(0) then
    dx=dx-0.05
  end

  if btn(1) then
    dx=dx+0.05
  end

  if btnp(2) and
    (on_ground or jump<2) then
    on_ground=false
    jump+=1
    dy=dy-2
  end

  if hit(x+dx,y,7,7) then
    dx=0
  end

  if hit(x,y+dy,7,7) then
    if dy>0 then
      on_ground=true
    end
    dy=0
  end

  if on_ground then
    dx=dx*0.95
    jump=0
  end

  y=y+dy
  x=x+dx

end
Once all this is in place, you should have a very simple tile based collision system. This means you can design a map and the code will take care of the collisions for you.
Happy programming!


I noticed in your video for back ground collisions you only use one for loop (for I=x). However, in this tutorial you are also using (for I=y). Any reason to use both over one?
Sorry for the delay in replying!
You’re quite right – for completeness it is better to check both, but for a square object as an overlap in y also represents an overlap in x (i.e even one pixel will overlap in both directions) we can get away with just one. collision.