Having a scrolling background and a static player can be a very simple way of giving the illusion of movement. If you add into that parallax scrolling, you can add the idea of depth to your game. Luckily, setting up the scrolling in PICO-8 is very straightforwards.
To scroll a background we are going to make use of the map() function that was introduced in an earlier ‘First Steps’ post. Map will draw the contents of the map editor to the screen. The syntax for the map() function is described here in detail, but basically it works as follows:
map( mapx, mapy, screenx, screeny, mapwidth, mapheight )
- mapx: The x cell number of the map. This is the location of the top left of the map in the map editor, found by counting the number of tiles or cells from the left edge.
- mapy: The y cell number of the map. This is the location of the top left of the map in the map editor, found by counting the number of tiles or cells from the top edge.
- screenx: The x coordinate on the game screen where the map is to be drawn – this is measured in pixels.
- screeny: The y coordinate of the game screen where the map is to be drawn – this is measured in pixels.
- mapwidth: The number of map cells wide in the region to draw – measured in cells.
- mapheight: The number of map cells tall in the region to draw – measured in cells.
The toughest thing to get your head around when drawing a map is the difference between mapx and screenx. The key is that mapx, and mapy coupled with mapwidth and mapheight tell PICO-8 which bit of the map editor you want to draw, and they are measured in cells. screenx and screeny tell PICO-8 where to draw the map in you game and are measured in pixels.
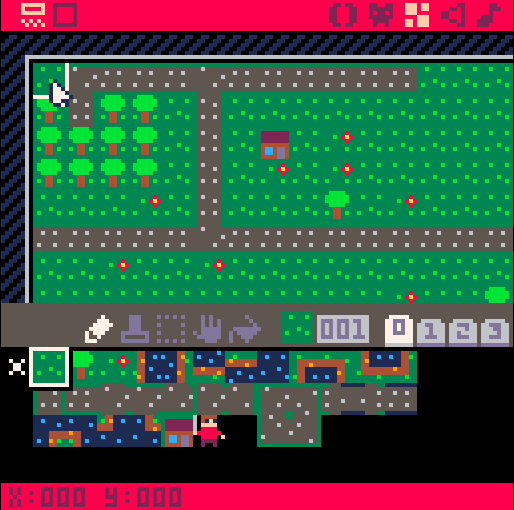
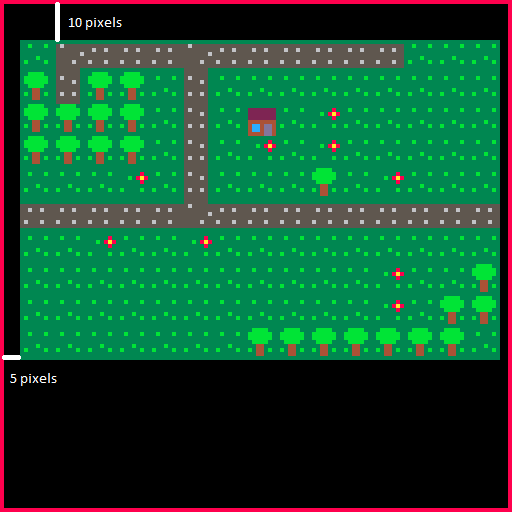
Take this example: we have a map that we have drawn and we want to display just the section from the top left (shown as 0,0 when the cursor is hovered over it, below).
We want to draw the map to some trees that are down and to the right. Hovering the cursor over these we see it shows x:14 and y:9.
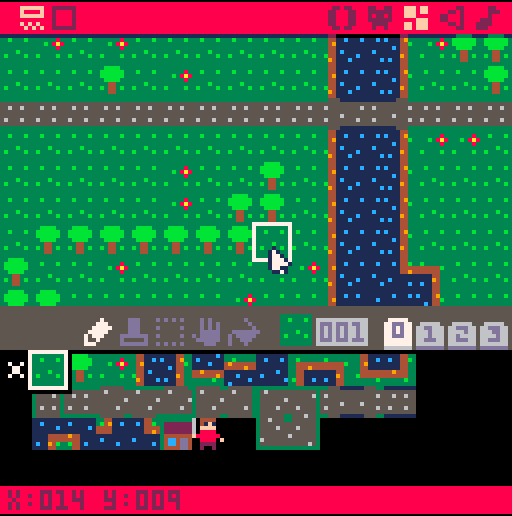
No, the important thing to note is that PICO-8 counts these cells from 0, so these cells are 15 and 10 from the top left of the screen. If we had decided to draw from 1,1 then these cells would have been 14 and 9 away from that location. What we are concerned with is the DISTANCE from the starting corner.
Now, in an example piece of code, I will draw this section of the map 5 pixels in from the left edge and 10 pixels in from the top.
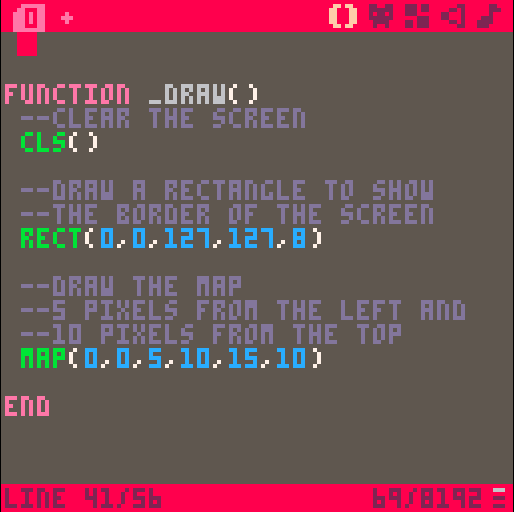
The code that is shown above uses the map() function with the values we have worked out:
- mapx: 0
- mapy: 0
- screenx: 5
- screeny: 10
- mapwidth: 15
- mapheight: 10
To give this result (white text was added afterwards to highlight the gap we put in):
Scrolling Backgrounds
So, how does this help us draw a scrolling background? Well, if we control the location on the game screen, we can slowly move the background to the left of the game and allow it to slide across the screen. To do this we are going to need a variable for the position of the background and also a variable to control the speed that it will move. In this example, I will look at horizontal scrolling, but the principles apply to scrolling in any direction.
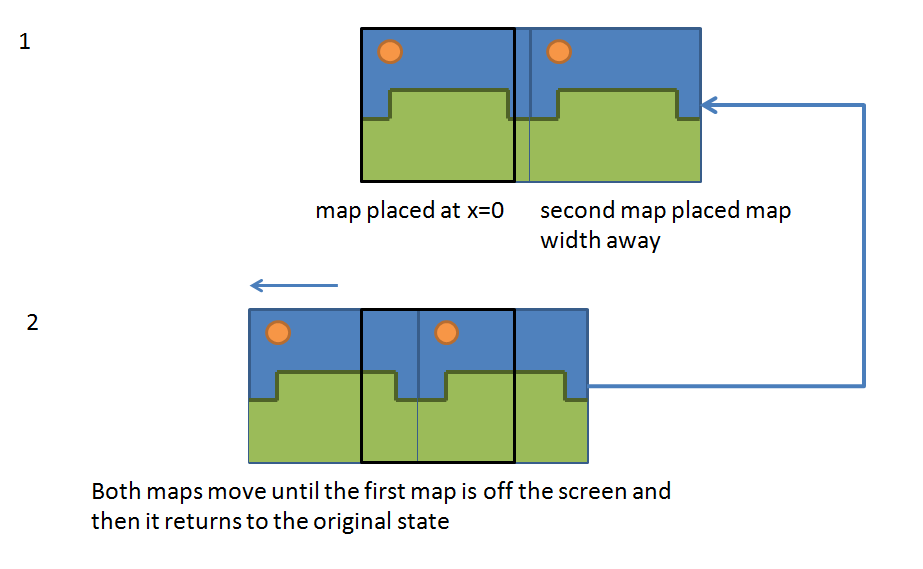
To make this work we will need to draw two copies of the background and place them next to each other. We then keep change the x location of the background and watch as they slide past the screen. When one copy of the background has scrolled fully off the screen, we place it back at the start and so the seamless scrolling continues.
First we need to initialise the variables to keep track of the position of the map. This forms part of our function _init(), but it could go anywhere.
function _init()
  map_x=0
  map_spd=1
end
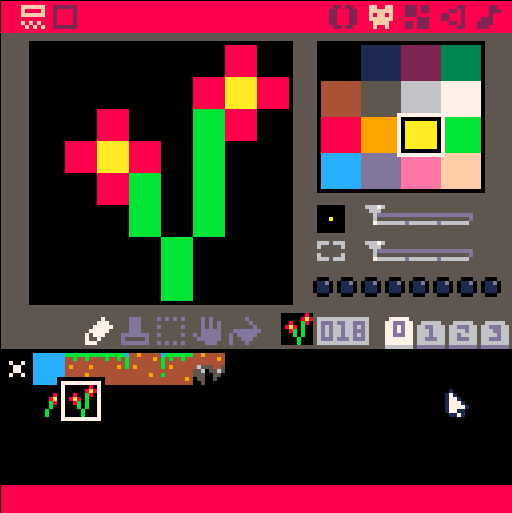
Next we need to draw the background map. I am drawing platform style game, so I have produced some tiles in the sprite editor. I plan to draw the background in blue using cls(12), so I have left the tile background black (transparent).
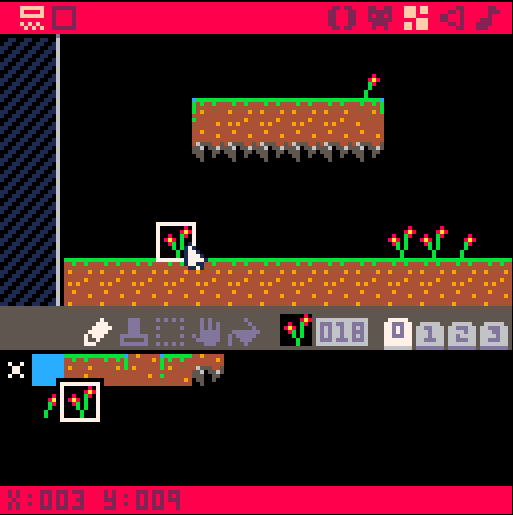
I then built the map in the map editor to be 16 tiles wide and 16 tiles high.
Now, in the _update() function we need to slide the map along, so we need the map_x value to slowly get less. This will draw the map towards the left of the screen. When the map has fully left the screen we draw it back at 0. Because we are using a < operator, we need to check if the map_x value is <-127 as this will return true when the map_x is at -128. We get the value of 128 because the map is 16 tiles wide (16 x 8 = 128).
For smooth scrolling I have used _update60(), but you don’t have to do that.
function _update60()
  map_x-=map_spd
  if map_x<-127 then map_x=0 end
end
Finally, we need to draw this to the screen. Don’t forget, we need two copies of the map to allow for seamless scrolling.
function _draw()
 --clear the screen to blue
 cls(12)
 map(0,map_x,0,16,16)
 map(0,0,128+map_x,0,16,16)
end
This should produce the following result.

It is possible to layer several different backgrounds at different speeds to show parallax scrolling.
The next first steps tutorial will show how this is achieved.
Happy programming

