
A game without any collisions would be a very boring game indeed, but programming the functionality required for collisions is something that leaves a lot of people baffled. This post take you through a very simple collision function that will enable your project to start acting more like a game. Please note, this is genuinely a beginners’ tutorial – there are more elaborate collision detection routines out there, and this will not be suitable for all games, but it will get you started!
The first stage to working with collisions is to work out what is colliding. It is possible to check every pixel on two sprites to see if they overlap, but the processing required to do this would be prohibitive. Instead, when working with PICO-8, the best way to deal with collisions is to use a bounding box around your sprites and check collisions between the boxes.
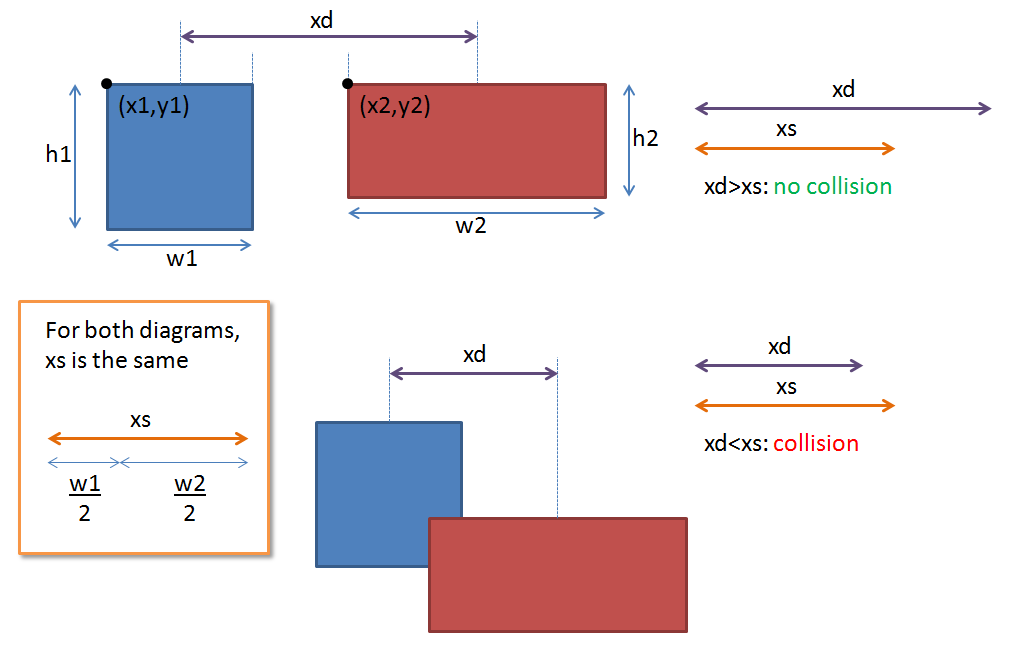
So, how to check for collisions between boxes? There are many ways of doing this, but a simple one is to check whether the distance between the midpoints of the two boxes is greater than the sum of the half box widths. As a statement, that’s hardly worth reading, so this diagram should describe what is going on.
So we need to check whether this happening. To do this we make use of a function that takes the coordinates and width of two boxes and returns either true or false for a collision between the boxes.
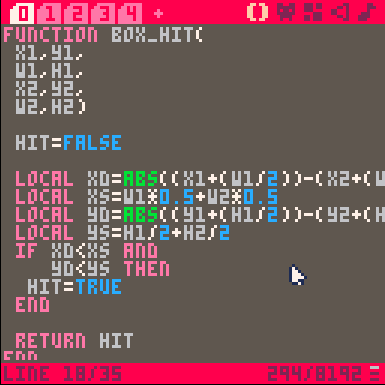
function box_hit(
  x1,y1,
  w1,h1,
  x2,y2,
  w2,h2)

  hit=false

  local xd=abs((x1+(w1/2))-(x2+(w2/2)))
  local xs=w1*0.5+w2*0.5
  local yd=abs((y1+(h1/2))-(y2+(h2/2)))
  local ys=h1/2+h2/2
  if xd<xs and
     yd<ys then
    hit=true
  end

  return hit
end
You can see in this code that we calculate two variables, xd and yd, to be the absolute value (that is, negative values will lose the negative sign) of the distance between the middle of the two boxes in the x and y direction (see the diagram above). Two other variables, xs and ys, represent the maximum distance between the two boxes before they are no longer touching (again, shown in the diagram above).
Finally, the code checks if both xd is smaller than xs and yd is smaller than ys and if both are smaller returns true (i.e. there is a collision).
To implement this function, we need to call it in the same way we would call any other function in the game. If we look at a function in PICO-8 like spr(), we see that we need to give it at least three values: spr(sprite_number,x_coordinate,y_coordinate). Our function is the same, but requires 8 values:
box_hit(x1,y1,w1,h1,x2,y2,w2,h2) where
x1, y1 are the top left coordinates of the first box
w1, h1 are the width and height of the first box
x2, y2 are the top left coordinates of the second box
w2, h2 are the width and height of the second box
The function returns true if the boxes are hitting and false if not. This means we can put the box_hit() function into a conditional statement with very little effort:
if box_hit(x,y,w,h,ex,ey,ew,eh) then
  --play a sound for the collision
  sfx(1)
end
This piece of code will play a sound if two boxes collide.
Let’s have a look at implementing this into a very simple program.
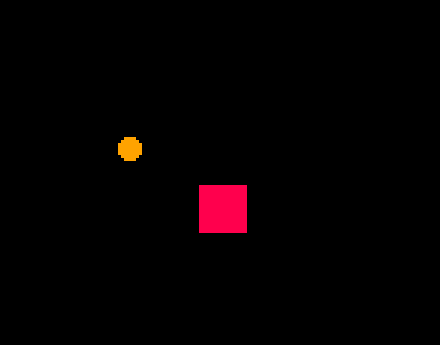
To start with I am going to draw two sprites, one will be a simple ball and the other a square that takes up 2×2 sprites. I will write a follow-up post looking at circle collisions later on as not everything can be simulated with a box but, for the time-being, this works well.
![]()
Next, I paste the box_hit function into the first tab.
Next I need a draw function to draw the two sprites. If you’ve followed the other tutorials (starting here) then this should be very familiar. This can be placed in a new tab.
function _draw()
  cls()
  spr(1,x,y)
  spr(2,ex,ey,2,2)
end
The variables relate to the two sprites, the player (x,y) and the enemy (ex,ey). We need to declare these variables so in another tab along with the width and height of the two sprites (w,h and ew,eh). These can go in another tab which will later have the _update() function. The width and height are very powerful as they allow you to get very accurate collision detection using differently shaped sprites.
x=10
y=10
w=8
h=8

ex=64
ey=64
ew=16
eh=16
Now, we need to move the player block (sprite 1). So, as promised, underneath the variables we have just declared we can put the _update() function:
function _update()
  if btn(0) then x=x-1 end
  if btn(1) then x=x+1 end
  if btn(2) then y=y-1 end
  if btn(3) then y=y+1 end
end
When we run this code we get a ball moving around a square, but when the ball moves over the square, nothing happens. This is because the hit_box() function has not been called. To get this to work we need a bit of creative thinking and we will use an approach called a priori collision detection.
This works by checking where an object is going to be during the next cycle and then checking this new location for a collision. If the new location is clear, the object is moved, but if it is not clear, the object is left where it is. To allow for the object to slide along the edges we need to make this check for the x and y direction separately.
To do this we need two new variables, newx and newy which will hold the new location of the sprite. We add these to the tab with the variables and update function. Tab 2 should now contain these variables:
x=10
y=10
w=8
h=8

ex=64
ey=64
ew=16
eh=16

newx=x
newy=y
The _update() function has to change slightly. Now the sprite’s coordinates aren’t updated straight away. Instead we use the button press to set the newx and newy coordinates
function _update()
  if btn(0) then newx=x-1 end
  if btn(1) then newx=x+1 end
  if btn(2) then newy=y-1 end
  if btn(3) then newy=y+1 end
end
Now, we need to check whether moving to newx or newy will result in a collision and only move to these new coordinates if they are free. To do this we use the not operator and the hit_box() function to ask if we have NOT hit anything, and only then do we set the sprite coordinates to the new location. therefore, we add some conditional if statements to the _update() function.
function _update()
  if btn(0) then newx=x-1 end
  if btn(1) then newx=x+1 end
  if btn(2) then newy=y-1 end
  if btn(3) then newy=y+1 end

  if not box_hit(
    x,newy,w,h,ex,ey,ew,eh) then
    y=newy
  end
  if not box_hit(
    newx,y,w,h,ex,ey,ew,eh) then
    x=newx
  end
end
When we run this code we get a collision with the sprite happily sliding against the box.
Quick, easy and effective collisions. If have attached the entire code block that can be pasted into a project. You will also need two sprites: sprite 1 is a single 8×8 and sprite 2 is a 2 square 16×16 sprite.
In the next post I look at improving the functionality further to take into account faster moving objects. I will also put together a post about other shaped hitboxes.
Happy programming!

